

搜索到
22
篇与
最新文章
的结果
-
 Ruoyi框架安装教程 部署准备确保你的电脑已安装如下环境或者软件IDEA (用于后端项目)vscode (用于前端项目)Navicat (用于mysql)JavaJDK >= 1.8MySQL >= 5.7Maven >= 3.0Node >= 12Redis >= 3git 用于拉取项目代码(也可以自己手动下载){dotted startColor="#ff6c6c" endColor="#1989fa"/}后端部署代码下载:https://gitee.com/y_project/RuoYi-Vue可以使用git拉取或者手动下载,版本根据自己需求选择即可,我下载的是v3.9.0,下载完成后是一个压缩包解压后使用idle打开即可启动 Redis启动mysql这个由于我暂时使用的是云数据库就不演示了导入sql文件将项目中的sql文件夹在资源管理器显示,然后使用Navicat或者其它mysql工具运行这两个sql文件内即可,由于我是云数据库就不演示了,不太懂得可以百度 mysql数据库导入sql文件启动之后回到idle修改文件中的Redis和mysql的配置Redis配置Mysql配置最后就可以在 RuoYiApplication 中启动项目了{dotted startColor="#ff6c6c" endColor="#1989fa"/}前端部署1.进入项目目录cd ruoyi-ui2.安装依赖 npm install 3.强烈建议不要用直接使用 cnpm 安装,会有各种诡异的 bug,可以通过重新指定 registry 来解决 npm 安装速度慢的问题。npm install --registry=https://registry.npmmirror.com4.本地开发 启动项目 npm run dev 5.运行成功之后会自动打开浏览器可能遇到的问题1.Redis错误:Could not create server TCP listening socket 127.0.0.1:6379: bind: 操作成功完成。原因:6379端口已绑定。应该是因为上次服务没有关闭解决方法:①依次输入命令:redis-cli.exe(启动redis客户端,连接本机6379端口(127.0.0.1)并启动redis服务)shutdownexit②再次启动redis服务:redis-server.exe redis.windows.conf{dotted startColor="#ff6c6c" endColor="#1989fa"/}2.在vscode或者控制台运行npm指令时遇到如下报错信息:“因为在此系统上禁止运行脚本”解决办法如下:搜索“powershell”,并“以管理员身份运行”使用命令“set-ExecutionPolicy RemoteSigned”,将计算机上的执行策略更改为 RemoteSigned,然后再次运行npm就可以了
 -
-
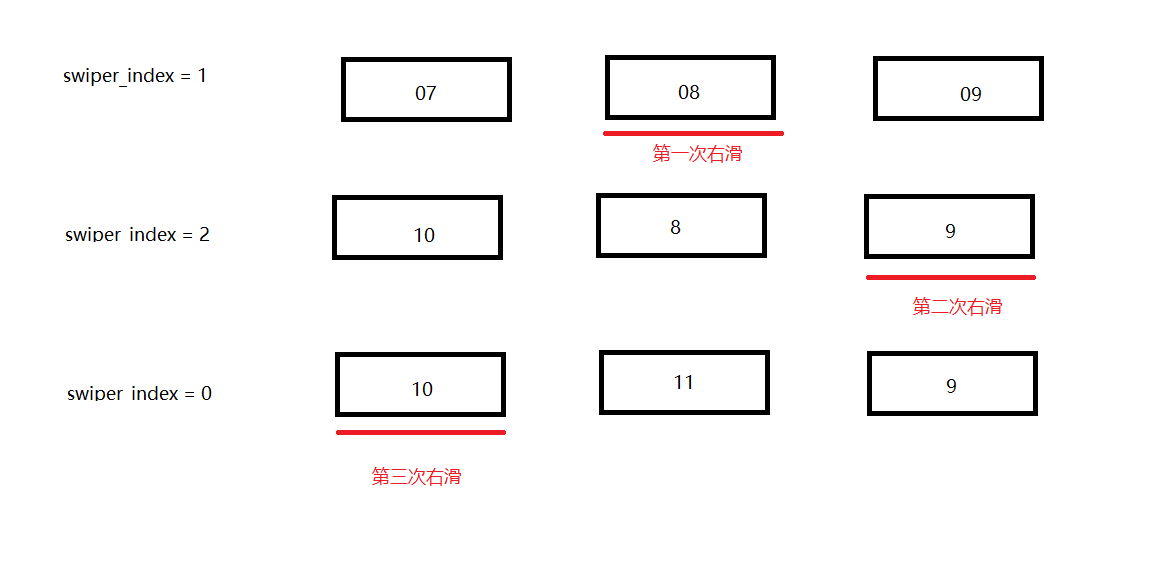
微信小程序实现swiper无限滚动和预加载 月份卡片无限滚动和预加载示例,只要 list 长度=3,swiper 的 circular 就能做出无限滑动的错觉;再配合月份数组的整体左移/右移,让视觉与数据始终保持同步swiper 注意开启循环 circular,默认停在中间卡片 current="{{1}}"右滑实现原理,左滑同样的,通过判断swiper下标调整list位置即可<swiper class="swiper" circular indicator-dots current="{{1}}" bindanimationfinish="onSwiperFinish"> <swiper-item wx:for="{{list}}" wx:key="id"> <view class="page" style="background: {{item.color}}"> <view class="txt">{{item.title}}</view> <view class="txt">当前月 - {{timelist[swiper_index]}}</view> </view> </swiper-item> </swiper>Page({ data: { list: [{ id: 1, title: '页面 1', color: '#ff7675' }, { id: 2, title: '页面 2', color: '#74b9ff' }, { id: 3, title: '页面 3', color: '#55efc4' } ], swiper_index: 1, //当前滑动下标 swiper_diff: 0, //滑动操作,1右滑,0左滑 last_swiper_index: 1, //上一个滑动下标 timelist: [] }, async onLoad() { this.IniDate(); }, // 初始化日期数据 async IniDate(date = new Date()) { console.log("开始初始化时间..."); const year = date.getFullYear(); const month = (date.getMonth() + 1).toString().padStart(2, '0'); const day = date.getDate().toString().padStart(2, '0'); const currentDate = `${year}/${month}/${day}`; this.setData({ now_date: currentDate, now_date_: `${year}-${month}-${day}`, now_Year: year, now_Month: month, }); console.log("时间初始化完成~"); const timeArr = this.data.now_date.split('/'); const currentMonth = timeArr[1].padStart(2, '0'); const currentYear = timeArr[0]; let searchMonthList = [`${currentYear}-${currentMonth}`]; // 计算前后月份 if (Number(currentMonth) > 1 && Number(currentMonth) < 12) { const preMonth = (Number(currentMonth) - 1).toString().padStart(2, '0'); const nextMonth = (Number(currentMonth) + 1).toString().padStart(2, '0'); searchMonthList = [`${currentYear}-${preMonth}`, searchMonthList[0], `${currentYear}-${nextMonth}`]; } else if (Number(currentMonth) === 1) { const preYear = Number(currentYear) - 1; searchMonthList = [`${preYear}-12`, searchMonthList[0], `${currentYear}-02`]; } else if (Number(currentMonth) === 12) { const nextYear = Number(currentYear) + 1; searchMonthList = [`${currentYear}-11`, searchMonthList[0], `${nextYear}-01`]; } // 处理日历列表展示顺序 const index = this.data.swiper_index; const diff = this.data.swiper_diff; let allList = []; const list = searchMonthList; // 右滑处理 if (diff == 1) { if (index === 0) { allList = [list[1], list[2], list[0]]; } else if (index === 1) { allList = [list[0], list[1], list[2]]; } else if (index === 2) { allList = [list[2], list[0], list[1]]; } } else { // 左滑处理 if (index === 1) { allList = [list[0], list[1], list[2]]; } else if (index === 0) { allList = [list[1], list[2], list[0]]; } else if (index === 2) { allList = [list[2], list[0], list[1]]; } } console.log(diff, index, allList) this.setData({ timelist: allList }); }, // 用户滑动swiper onSwiperFinish(e) { const swiper_index = e.detail.current; const last_swiper_index = this.data.last_swiper_index const diff = swiper_index - last_swiper_index; // 判断滑动方向 1,-2 右滑, -1,2 左滑 if (diff === 1 || diff === -2) { this.setData({ swiper_diff: 1 }) console.log("右滑"); this.nextMonth(); } else if (diff === -1 || diff === 2) { this.setData({ swiper_diff: 0 }) console.log("左滑"); this.prevMonth(); } this.setData({ swiper_index: swiper_index, last_swiper_index: swiper_index }) }, // 切换到上个月 async prevMonth() { const date = new Date(this.data.now_date); const prev = await this.prevMonth_date(date); console.log(prev) this.IniDate(prev, true); }, // 切换到下个月 async nextMonth() { const date = new Date(this.data.now_date); const next = await this.nextMonth_date(date); console.log(next) this.IniDate(next, true); }, nextMonth_date(date) { const d = new Date(date); // 克隆 const dayOfMonth = d.getDate(); d.setDate(1); // 先挪到 1 号,避免 31→3 月 3 日 d.setMonth(d.getMonth() + 1); const lastDay = new Date(d.getFullYear(), d.getMonth() + 1, 0).getDate(); d.setDate(Math.min(dayOfMonth, lastDay)); // 取较小值防止溢出 return d; }, prevMonth_date(date) { const d = new Date(date); // 克隆 const dayOfMonth = d.getDate(); d.setDate(1); // 先挪到 1 号,避免 31→3 月 3 日 d.setMonth(d.getMonth() - 1); const lastDay = new Date(d.getFullYear(), d.getMonth() + 1, 0).getDate(); d.setDate(Math.min(dayOfMonth, lastDay)); // 取较小值防止溢出 return d; }, }); /* pages/index/index.wxss */ .wrap { height: 100vh; display: flex; align-items: center; justify-content: center; } .swiper { margin-top: 200rpx; width: 90%; height: 500rpx; margin-left: 5%; border-radius: 10rpx; } .page { border-radius: 10rpx; padding: 10rpx; height: 500rpx; font-size: 40rpx; } .txt { margin-top: 100rpx; text-align: center; color: #fff; font-size: 40rpx; width: 100%; height: 100rpx; }
-
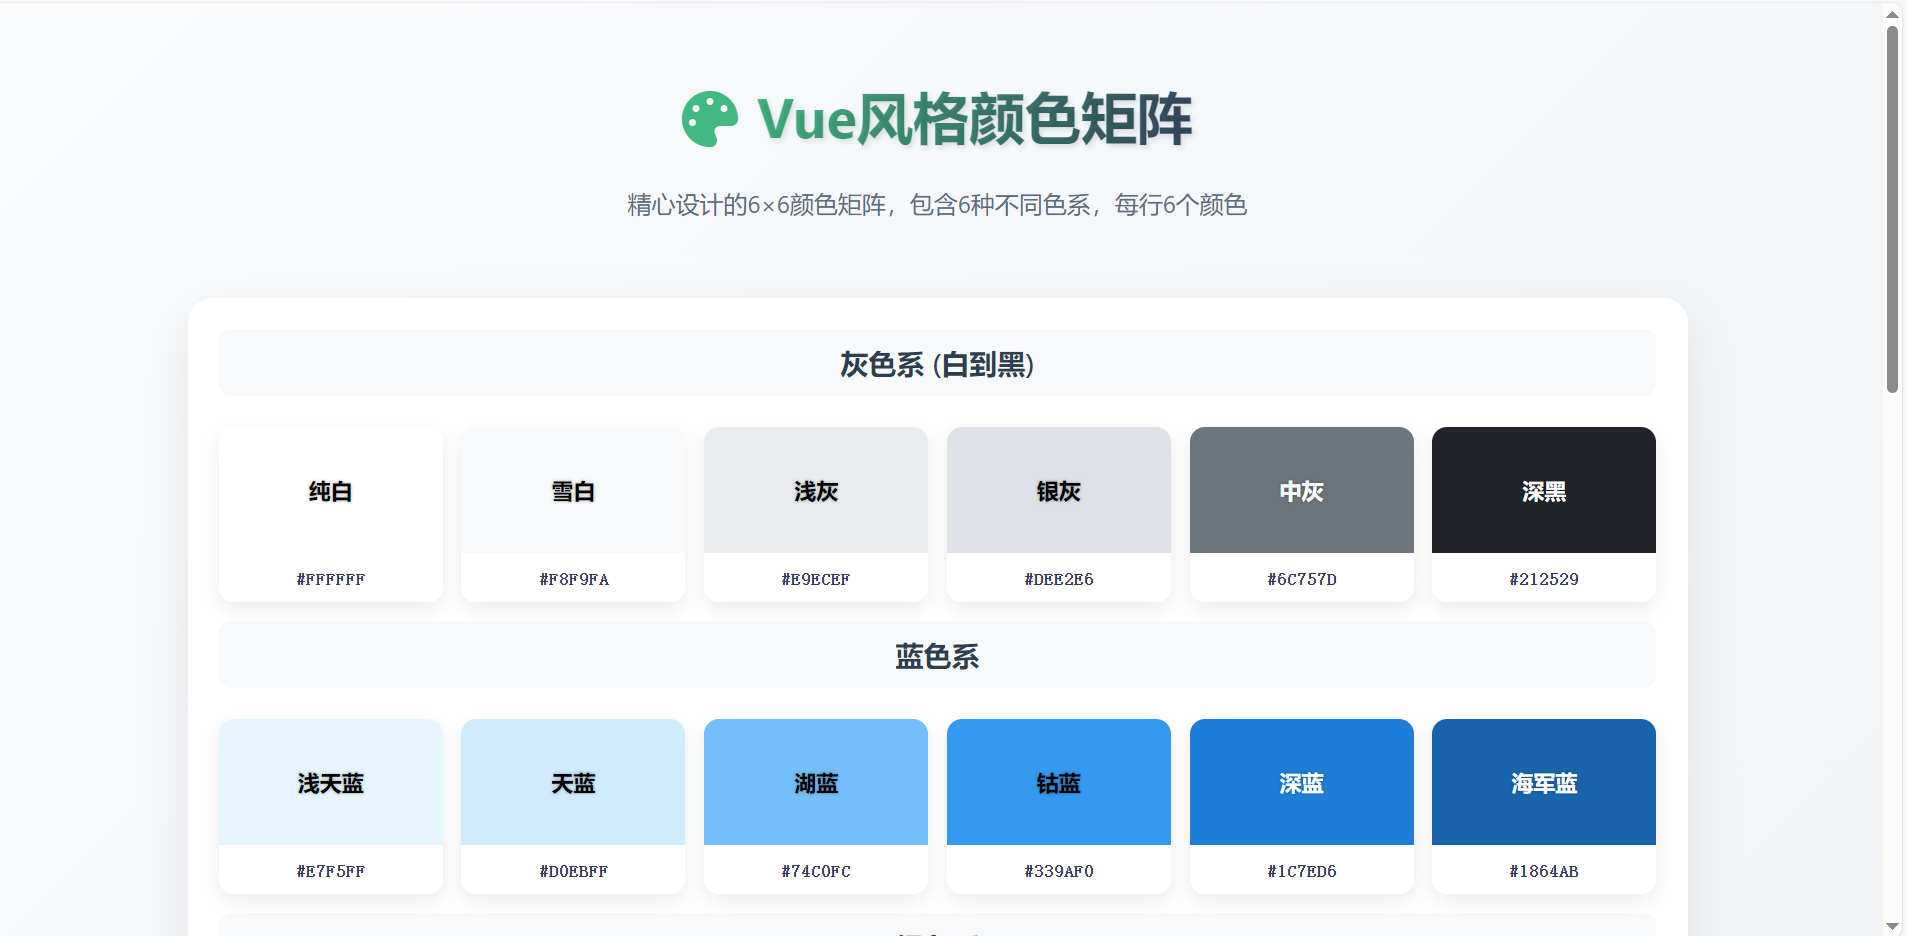
颜色展示网页 一个展示预设颜色的HTML页面,使用您提供的颜色预设数组,创建一个美观的颜色展示界面<!DOCTYPE html> <html lang="zh-CN"> <head> <meta charset="UTF-8"> <meta name="viewport" content="width=device-width, initial-scale=1.0"> <title>Vue风格颜色矩阵展示器</title> <link rel="stylesheet" href="https://cdnjs.cloudflare.com/ajax/libs/font-awesome/6.4.0/css/all.min.css"> <style> * { margin: 0; padding: 0; box-sizing: border-box; font-family: 'Segoe UI', 'Microsoft YaHei', sans-serif; } body { background: linear-gradient(135deg, #f8fafc 0%, #eef2f6 100%); min-height: 100vh; display: flex; flex-direction: column; align-items: center; padding: 40px 20px; color: #2c3e50; } .container { max-width: 1200px; width: 100%; } header { text-align: center; margin-bottom: 40px; padding: 20px; } .logo { display: flex; align-items: center; justify-content: center; gap: 15px; margin-bottom: 20px; } .logo-icon { font-size: 2.8rem; color: #42b883; } h1 { font-size: 2.8rem; margin-bottom: 5px; background: linear-gradient(90deg, #42b883, #35495e); -webkit-background-clip: text; background-clip: text; color: transparent; text-shadow: 2px 2px 4px rgba(0,0,0,0.1); } .subtitle { font-size: 1.2rem; color: #5a6c7d; max-width: 700px; margin: 0 auto; line-height: 1.6; } .color-grid { display: grid; grid-template-columns: repeat(6, 1fr); gap: 15px; margin-top: 20px; background: white; padding: 25px; border-radius: 20px; box-shadow: 0 15px 40px rgba(0,0,0,0.08); } .color-row-header { grid-column: 1 / -1; display: grid; grid-template-columns: repeat(6, 1fr); gap: 15px; margin-bottom: 10px; } .row-title { grid-column: 1 / -1; text-align: center; font-size: 1.4rem; font-weight: 600; padding: 12px; margin-bottom: 10px; border-radius: 10px; background: #f8f9fa; } .color-card { height: 140px; border-radius: 12px; overflow: hidden; box-shadow: 0 6px 15px rgba(0,0,0,0.08); transition: all 0.3s ease; cursor: pointer; position: relative; display: flex; flex-direction: column; justify-content: space-between; } .color-card:hover { transform: translateY(-8px); box-shadow: 0 12px 25px rgba(0,0,0,0.15); } .color-preview { flex-grow: 1; display: flex; align-items: center; justify-content: center; } .color-info { padding: 10px; background: rgba(255, 255, 255, 0.85); text-align: center; font-weight: 600; font-size: 0.9rem; } .color-hex { font-family: 'Fira Code', monospace; font-size: 0.85rem; } .copy-btn { position: absolute; top: 10px; right: 10px; background: rgba(255, 255, 255, 0.8); border: none; border-radius: 50%; width: 28px; height: 28px; cursor: pointer; display: flex; align-items: center; justify-content: center; opacity: 0; transition: all 0.3s; box-shadow: 0 2px 5px rgba(0,0,0,0.1); } .color-card:hover .copy-btn { opacity: 1; } .copy-btn:hover { background: white; transform: scale(1.1); } .copy-notification { position: fixed; top: 30px; left: 50%; transform: translateX(-50%); background: rgba(66, 184, 131, 0.9); color: white; padding: 12px 25px; border-radius: 8px; font-weight: 500; opacity: 0; transition: opacity 0.3s; pointer-events: none; display: flex; align-items: center; gap: 10px; } .copy-notification.show { opacity: 1; } .footer { margin-top: 40px; text-align: center; color: #5a6c7d; padding: 20px; font-size: 0.9rem; border-top: 1px solid #eaeaea; width: 100%; } @media (max-width: 992px) { .color-grid { grid-template-columns: repeat(3, 1fr); } } @media (max-width: 768px) { .color-grid { grid-template-columns: repeat(2, 1fr); } h1 { font-size: 2.2rem; } } @media (max-width: 480px) { .color-grid { grid-template-columns: 1fr; } h1 { font-size: 1.8rem; } } </style> </head> <body> <div class="container"> <header> <div class="logo"> <i class="fas fa-palette logo-icon"></i> <h1>Vue风格颜色矩阵</h1> </div> <p class="subtitle"> 精心设计的6×6颜色矩阵,包含6种不同色系,每行6个颜色 </p> </header> <div class="color-grid" id="colorGrid"> <!-- 颜色将通过JS动态生成 --> </div> </div> <div class="copy-notification" id="copyNotification"> <i class="fas fa-check-circle"></i> <span>颜色值已复制到剪贴板!</span> </div> <div class="footer"> <p>© 2023 Vue风格颜色矩阵 | 共展示 <span id="colorCount">36</span> 个预设颜色</p> </div> <script> // 颜色预设数组 - 6行每行6个颜色 const colorPresets = [ // 第一行:白色到黑色(灰色系) [ { hex: '#FFFFFF', name: '纯白' }, { hex: '#F8F9FA', name: '雪白' }, { hex: '#E9ECEF', name: '浅灰' }, { hex: '#DEE2E6', name: '银灰' }, { hex: '#6C757D', name: '中灰' }, { hex: '#212529', name: '深黑' } ], // 第二行:蓝色系 [ { hex: '#E7F5FF', name: '浅天蓝' }, { hex: '#D0EBFF', name: '天蓝' }, { hex: '#74C0FC', name: '湖蓝' }, { hex: '#339AF0', name: '钴蓝' }, { hex: '#1C7ED6', name: '深蓝' }, { hex: '#1864AB', name: '海军蓝' } ], // 第三行:绿色系 [ { hex: '#E6FCF5', name: '薄荷绿' }, { hex: '#C3FAE8', name: '春绿' }, { hex: '#96F2D7', name: '翡翠绿' }, { hex: '#40C057', name: '草绿' }, { hex: '#2F9E44', name: '森林绿' }, { hex: '#2B8A3E', name: '深绿' } ], // 第四行:紫色系 [ { hex: '#F3F0FF', name: '薰衣草' }, { hex: '#E5DBFF', name: '淡紫' }, { hex: '#D0BFFF', name: '紫藤' }, { hex: '#B197FC', name: '紫罗兰' }, { hex: '#845EF7', name: '皇家紫' }, { hex: '#5F3DC4', name: '深紫' } ], // 第五行:红色系 [ { hex: '#FFF5F5', name: '粉红' }, { hex: '#FFE3E3', name: '玫瑰红' }, { hex: '#FFC9C9', name: '珊瑚红' }, { hex: '#FF6B6B', name: '鲜红' }, { hex: '#F03E3E', name: '绯红' }, { hex: '#C92A2A', name: '深红' } ], // 第六行:其他色系(黄色、橙色、青色等) [ { hex: '#FFF9DB', name: '浅黄' }, { hex: '#FFEC99', name: '柠檬黄' }, { hex: '#FFD43B', name: '金黄' }, { hex: '#FFA94D', name: '橙黄' }, { hex: '#FF922B', name: '橙红' }, { hex: '#20C997', name: '青绿' } ] ]; // 行标题 const rowTitles = [ "灰色系 (白到黑)", "蓝色系", "绿色系", "紫色系", "红色系", "其他色系" ]; // 获取DOM元素 const colorGrid = document.getElementById('colorGrid'); const copyNotification = document.getElementById('copyNotification'); const colorCount = document.getElementById('colorCount'); // 计算总颜色数量 const totalColors = colorPresets.reduce((total, row) => total + row.length, 0); colorCount.textContent = totalColors; // 创建颜色网格 colorPresets.forEach((row, rowIndex) => { // 添加行标题 const rowTitle = document.createElement('div'); rowTitle.className = 'row-title'; rowTitle.textContent = rowTitles[rowIndex]; colorGrid.appendChild(rowTitle); // 添加颜色卡片 row.forEach(color => { const colorCard = document.createElement('div'); colorCard.className = 'color-card'; // 计算文字颜色(深色背景用白色文字,浅色背景用黑色文字) const rgb = hexToRgb(color.hex); const brightness = (rgb.r * 299 + rgb.g * 587 + rgb.b * 114) / 1000; const textColor = brightness > 128 ? '#000' : '#FFF'; colorCard.innerHTML = ` <div class="color-preview" style="background-color: ${color.hex};"> <span style="color: ${textColor}; font-size: 1.1rem; font-weight: bold; text-shadow: 0 0 3px rgba(0,0,0,0.3);">${color.name}</span> </div> <div class="color-info"> <span class="color-hex">${color.hex}</span> </div> <button class="copy-btn" data-color="${color.hex}"> <i class="far fa-copy"></i> </button> `; colorGrid.appendChild(colorCard); }); }); // 添加复制功能 document.querySelectorAll('.copy-btn').forEach(button => { button.addEventListener('click', function(e) { e.stopPropagation(); const color = this.getAttribute('data-color'); copyToClipboard(color); // 显示通知 copyNotification.classList.add('show'); setTimeout(() => { copyNotification.classList.remove('show'); }, 2000); }); }); // 辅助函数:十六进制转RGB function hexToRgb(hex) { const result = /^#?([a-f\d]{2})([a-f\d]{2})([a-f\d]{2})$/i.exec(hex); return result ? { r: parseInt(result[1], 16), g: parseInt(result[2], 16), b: parseInt(result[3], 16) } : { r: 0, g: 0, b: 0 }; } // 辅助函数:复制到剪贴板 function copyToClipboard(text) { const textarea = document.createElement('textarea'); textarea.value = text; document.body.appendChild(textarea); textarea.select(); document.execCommand('copy'); document.body.removeChild(textarea); } </script> </body> </html>
-
-
网站顶部浏览进度条 前言非常的简单,根据自己需求复制就好了,记得确保 jQuery 已加载 ::(你懂的)效果代码<!DOCTYPE html> <html lang="zh"> <head> <meta charset="UTF-8"> <meta name="viewport" content="width=device-width, initial-scale=1.0"> <title>浏览进度条示例</title> <style> :root { --back-line-right: linear-gradient(to right, #4caf50, #4caf50); /* 确保定义 CSS 变量 */ } #scrollProgressBar { width: 0; height: 3px; z-index: 1001; background-image: var(--back-line-right); border-radius: 5px; position: fixed; /* 确保进度条固定在页面顶部 */ top: 0; left: 0; transition: width 0.45s; } </style> <script src="https://code.jquery.com/jquery-3.6.0.min.js"></script> </head> <body> <!-- 顶部浏览进度条 --> <div id="scrollProgressBar"></div> <div style="height: 2000px;"> <!-- 模拟长页面内容 --> <h1>滚动以查看进度条</h1> <p>这是一个示例页面,滚动以查看顶部进度条如何工作。</p> <!-- 添加更多内容以增加页面高度 --> </div> <script> $(window).scroll(function() { let scrollTop = $(window).scrollTop(), documentHeight = $(document).height(), windowHeight = $(window).height(); let scrollPercent = (scrollTop / (documentHeight - windowHeight)) * 100; scrollPercent = scrollPercent.toFixed(1); $("#scrollProgressBar").css({ width: scrollPercent + "%" }); }).trigger("scroll"); </script> <!-- 顶部浏览进度条结束 --> </body> </html>