

搜索到
23
篇与
Blank
的结果
-
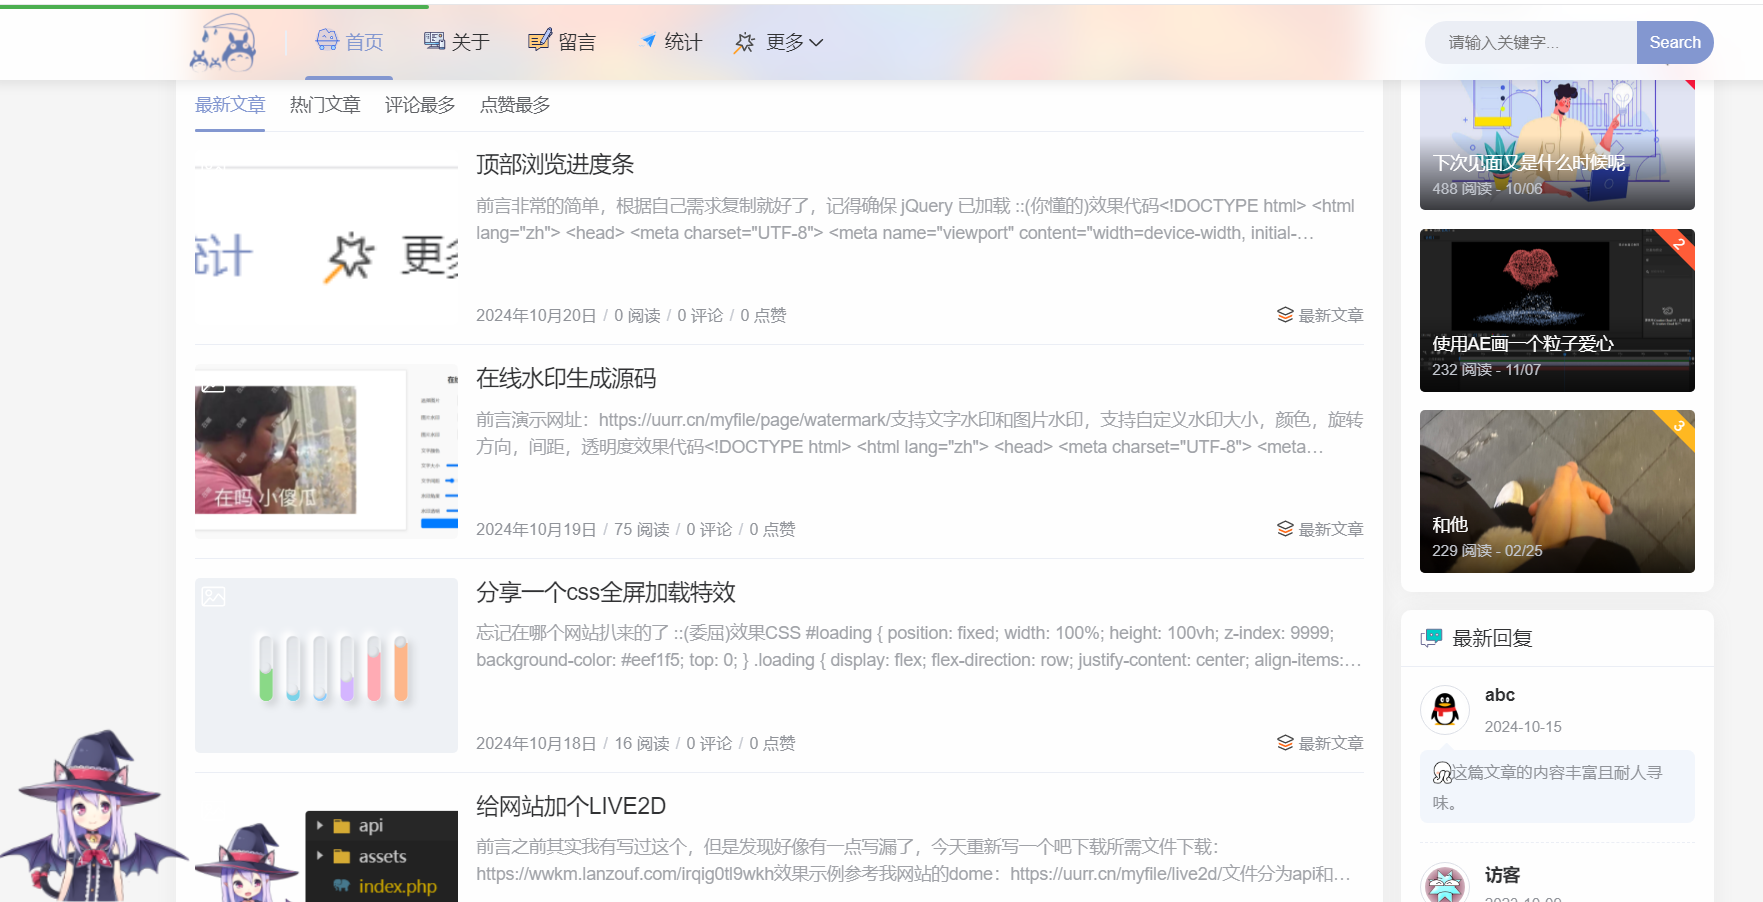
 网站顶部浏览进度条 前言非常的简单,根据自己需求复制就好了,记得确保 jQuery 已加载 ::(你懂的)效果代码<!DOCTYPE html> <html lang="zh"> <head> <meta charset="UTF-8"> <meta name="viewport" content="width=device-width, initial-scale=1.0"> <title>浏览进度条示例</title> <style> :root { --back-line-right: linear-gradient(to right, #4caf50, #4caf50); /* 确保定义 CSS 变量 */ } #scrollProgressBar { width: 0; height: 3px; z-index: 1001; background-image: var(--back-line-right); border-radius: 5px; position: fixed; /* 确保进度条固定在页面顶部 */ top: 0; left: 0; transition: width 0.45s; } </style> <script src="https://code.jquery.com/jquery-3.6.0.min.js"></script> </head> <body> <!-- 顶部浏览进度条 --> <div id="scrollProgressBar"></div> <div style="height: 2000px;"> <!-- 模拟长页面内容 --> <h1>滚动以查看进度条</h1> <p>这是一个示例页面,滚动以查看顶部进度条如何工作。</p> <!-- 添加更多内容以增加页面高度 --> </div> <script> $(window).scroll(function() { let scrollTop = $(window).scrollTop(), documentHeight = $(document).height(), windowHeight = $(window).height(); let scrollPercent = (scrollTop / (documentHeight - windowHeight)) * 100; scrollPercent = scrollPercent.toFixed(1); $("#scrollProgressBar").css({ width: scrollPercent + "%" }); }).trigger("scroll"); </script> <!-- 顶部浏览进度条结束 --> </body> </html>
 -
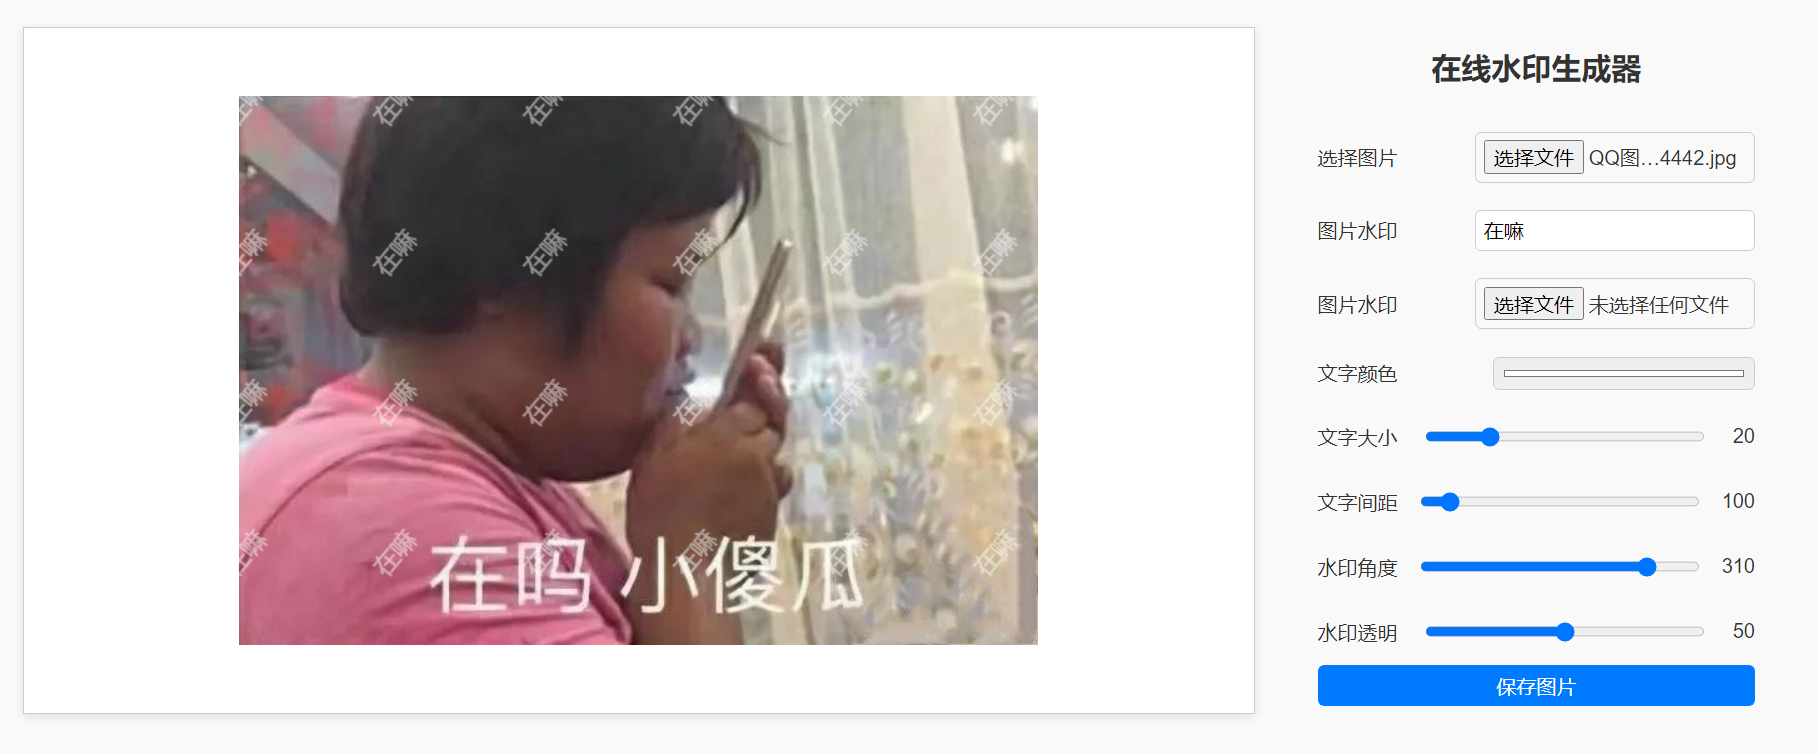
在线水印生成源码 前言演示网址:https://uurr.cn/myfile/page/watermark/支持文字水印和图片水印,支持自定义水印大小,颜色,旋转方向,间距,透明度效果代码<!DOCTYPE html> <html lang="zh"> <head> <meta charset="UTF-8"> <meta name="viewport" content="width=device-width, initial-scale=1.0"> <title>水印生成器</title> <style> body { font-family: Arial, sans-serif; background-color: #f9f9f9; color: #333; display: flex; padding: 50px; margin: 0; } .image-container { flex: 1; display: flex; justify-content: center; align-items: center; border: 1px solid #ccc; background-color: white; box-shadow: 0 2px 8px rgba(0, 0, 0, 0.1); margin-right: 50px; } .settings-container { flex: 0 0 350px; /* 允许放大,基础宽度为310px */ display: flex; flex-direction: column; margin-right: 50px; } h1 { margin-bottom: 20px; font-size: 24px; text-align: center; } input[type="file"], input[type="text"], input[type="color"], input[type="range"], button { padding: 6px; margin: 6px 0; border: 1px solid #ccc; border-radius: 5px; width: 50%; font-size: 16px; } input[type="file"], input[type="text"], input[type="color"], input[type="range"], button { padding: 6px; margin: 6px 0; border: 1px solid #ccc; border-radius: 5px; width: 60%; font-size: 16px; } button { background-color: #007bff; color: white; border: none; cursor: pointer; transition: background-color 0.3s; width: 100%; } button:hover { background-color: #0056b3; } canvas { max-width: 90%; height: auto; } .slider-label { margin-top:10px ; display: flex; justify-content: space-between; align-items: center; } </style> </head> <body> <div class="image-container"> <canvas id="canvas"></canvas> </div> <div class="settings-container"> <h1>在线水印生成器</h1> <div class="slider-label"> <label>选择图片</label> <input type="file" id="imageUpload" accept="image/*" placeholder="上传主图"> </div> <div class="slider-label"> <label>图片水印</label> <input type="text" id="watermarkText" placeholder="输入水印文字" value="输入水印文字"> </div> <div class="slider-label"> <span>图片水印</span> <input type="file" id="watermarkImageUpload" accept="image/*" placeholder="上传水印图片"> </div> <div class="slider-label"> <label for="watermarkColor">文字颜色</label> <input type="color" id="watermarkColor" value="#ffffff"> </div> <div class="slider-label"> <label for="watermarkSize">文字大小</label> <input type="range" id="watermarkSize" min="1" max="100" value="20"> <span id="watermarkSizeValue">20</span> </div> <div class="slider-label"> <label for="spacing">文字间距</label> <input type="range" id="spacing" min="90" max="300" value="100"> <span id="spacingValue">100</span> </div> <div class="slider-label"> <label for="rotation">水印角度</label> <input type="range" id="rotation" min="0" max="360" value="310"> <span id="rotationValue">310</span> </div> <div class="slider-label"> <label for="opacity">水印透明</label> <input type="range" id="opacity" min="0" max="100" value="50"> <span id="opacityValue">50</span> </div> <button class="save" id="saveButton">保存图片</button> </div> <script> const imageUpload = document.getElementById('imageUpload'); const watermarkImageUpload = document.getElementById('watermarkImageUpload'); const watermarkText = document.getElementById('watermarkText'); const watermarkColor = document.getElementById('watermarkColor'); const watermarkSize = document.getElementById('watermarkSize'); const spacing = document.getElementById('spacing'); const rotation = document.getElementById('rotation'); const opacity = document.getElementById('opacity'); const saveButton = document.getElementById('saveButton'); const canvas = document.getElementById('canvas'); const ctx = canvas.getContext('2d'); let mainImage, watermarkImage; // 初始化数值显示 const watermarkSizeValue = document.getElementById('watermarkSizeValue'); const spacingValue = document.getElementById('spacingValue'); const rotationValue = document.getElementById('rotationValue'); const opacityValue = document.getElementById('opacityValue'); imageUpload.addEventListener('change', handleImageUpload); watermarkImageUpload.addEventListener('change', handleWatermarkImageUpload); watermarkText.addEventListener('input', generateWatermarkedImage); watermarkColor.addEventListener('input', generateWatermarkedImage); watermarkSize.addEventListener('input', () => { watermarkSizeValue.textContent = watermarkSize.value; // 更新文字大小数值 generateWatermarkedImage(); }); spacing.addEventListener('input', () => { spacingValue.textContent = spacing.value; // 更新间距数值 generateWatermarkedImage(); }); rotation.addEventListener('input', () => { rotationValue.textContent = rotation.value; // 更新旋转角度数值 generateWatermarkedImage(); }); opacity.addEventListener('input', () => { opacityValue.textContent = opacity.value; // 更新透明度数值 generateWatermarkedImage(); }); saveButton.addEventListener('click', saveImage); function handleImageUpload(event) { const file = event.target.files[0]; if (file) { const reader = new FileReader(); reader.onload = function (e) { mainImage = new Image(); mainImage.src = e.target.result; mainImage.onload = () => { canvas.width = mainImage.width; canvas.height = mainImage.height; generateWatermarkedImage(); } } reader.readAsDataURL(file); } } function handleWatermarkImageUpload(event) { const file = event.target.files[0]; if (file) { const reader = new FileReader(); reader.onload = function (e) { watermarkImage = new Image(); watermarkImage.src = e.target.result; watermarkImage.onload = generateWatermarkedImage; // 当图片加载完成时生成水印 } reader.readAsDataURL(file); } } function generateWatermarkedImage() { if (!mainImage) return; ctx.clearRect(0, 0, canvas.width, canvas.height); ctx.drawImage(mainImage, 0, 0); const size = parseInt(watermarkSize.value); const spacingValue = parseInt(spacing.value); const color = watermarkColor.value; const angle = parseInt(rotation.value) * (Math.PI / 180); // 角度转换为弧度 const alpha = parseInt(opacity.value) / 100; // 透明度转换为小数 const rows = Math.ceil(canvas.height / (size + spacingValue)); const cols = Math.ceil(canvas.width / (size + spacingValue)); for (let i = 0; i < rows; i++) { for (let j = 0; j < cols; j++) { const x = j * (size + spacingValue); const y = i * (size + spacingValue) + size; // +size 确保文字不会被遮挡 ctx.save(); // 保存当前状态 ctx.translate(x + size / 2, y - size / 2); // 移动到水印中心 ctx.rotate(angle); // 旋转 if (watermarkText.value) { ctx.font = `${size}px Arial`; ctx.fillStyle = color; ctx.globalAlpha = alpha; // 设置透明度 ctx.fillText(watermarkText.value, -ctx.measureText(watermarkText.value).width / 2, 0); // 绘制文字,中心对齐 } if (watermarkImage) { ctx.globalAlpha = alpha; // 设置透明度 ctx.drawImage(watermarkImage, -size / 2, -size / 2, size, size); // 假设图片水印也是方形 } ctx.restore(); // 恢复状态 } } ctx.globalAlpha = 1; // 重置透明度 } function saveImage() { const link = document.createElement('a'); link.download = 'watermarked-image.png'; link.href = canvas.toDataURL('image/png'); link.click(); } </script> </body> </html>代码详解HTML结构: 标签:为文件输入框提供描述。在用户点击标签时,可以直接触发文件选择窗口。 <input type="file"> :创建一个文件上传输入框,并设置accept属性,限制用户选择的文件类型为图片。 标签:用于显示用户当前选择的文件名,初始提示文本为“没有选择文件”。JavaScript函数:updateFileName()函数在用户选择文件时被调用。input.files是一个FileList对象,包含用户选择的文件。如果用户选择了文件,就会更新的文本内容为文件名;如果没有选择文件,则保持默认提示。
-
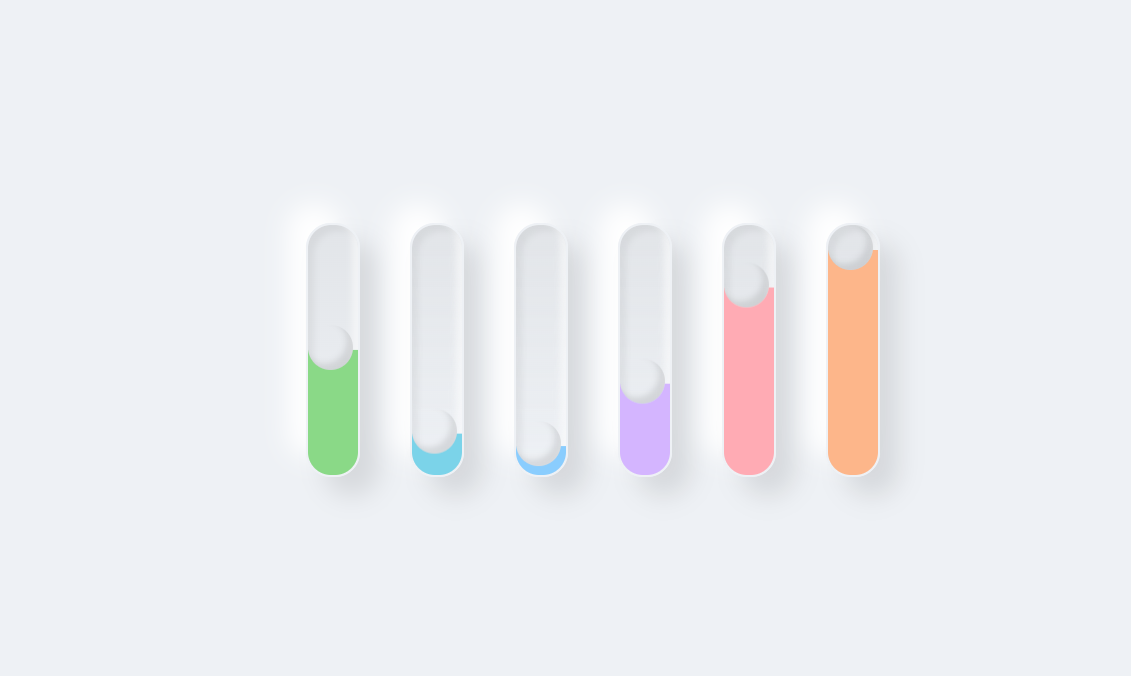
分享一个css全屏加载特效 忘记在哪个网站扒来的了 ::(委屈)效果CSS #loading { position: fixed; width: 100%; height: 100vh; z-index: 9999; background-color: #eef1f5; top: 0; } .loading { display: flex; flex-direction: row; justify-content: center; align-items: center; height: 100vh; } .loading div { position: relative; min-width: 40px; height: 200px; background: linear-gradient(to bottom, rgba(0, 0, 0, 0.05), #eef1f5); margin: 20px; border-radius: 20px; border: 2px solid #eef1f5; box-shadow: 15px 15px 20px rgba(0, 0, 0, 0.1), -15px -15px 20px #fff, inset -5px -5px 5px rgba(255, 255, 255, 0.5), inset 5px 5px 5px rgba(0, 0, 0, 0.05); overflow: hidden; } .loading div::before { content: ""; position: absolute; top: 0; left: 0; width: 36px; height: 36px; border-radius: 50%; box-shadow: inset -5px -5px 5px rgba(0, 0, 0, 0.1), 0 420px 0 400px lightskyblue; animation: animate 2s ease-in-out infinite; animation-delay: calc(var(--x) * -0.3s); transform: translateY(160px); } @keyframes animate { 0% { transform: translateY(160px); filter: hue-rotate(0deg); } 50% { transform: translateY(0px); filter: hue-rotate(180deg); } 100% { transform: translateY(160px); filter: hue-rotate(360deg); } }HTML 放在body开头即可 <!-- 懒加载组件 --> <div id="loading"> <div class="loading"> <div style="--x:0"></div> <div style="--x:1"></div> <div style="--x:2"></div> <div style="--x:3"></div> <div style="--x:4"></div> <div style="--x:5"></div> </div> </div>JS最后加载完成使用js删除,放在body尾部即可 <script> // 停止懒加载,展示页面 window.addEventListener('load', function () { var loading = document.getElementById('loading'); loading.parentNode.removeChild(loading); }); </script>
-
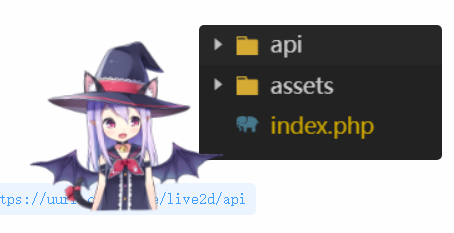
给网站加个LIVE2D 前言之前其实我有写过这个,但是发现好像有一点写漏了,今天重新写一个吧下载所需文件下载:https://wwkm.lanzouf.com/irqig0tl9wkh效果示例参考我网站的dome:https://uurr.cn/myfile/live2d/文件分为api和assetsapi是模型的接口,这个可以供别人使用也可以使用别人的,assets则是一些资源什么的你可以引用我网站的api资源 https://uurr.cn/myfile/live2d/api 接口下载好后在assets/waifu-tips.min.js文件中搜索 ;live2d_settings.modelAPI=" 将你的或者我的api接口填上去就像这样页面引用页面引用示例,要注意这里的目录别到时候引用错了<html xmlns="http://www.w3.org/1999/xhtml"> <head> <meta http-equiv="Content-Type" content="text/html; charset=UTF-8" /> <title>Live2D 看板娘 v1.4 / Demo 1</title> <link rel="stylesheet" type="text/css" href="assets/waifu.min.css?v=1.4.2"/> </head> <body style="font-family: 'Microsoft YaHei';"> <!-- waifu-tips.js 依赖 JQuery 库 --> <script src="assets/jquery.min.js?v=3.3.1"></script> <!-- 实现拖动效果,需引入 JQuery UI --> <script src="assets/jquery-ui.min.js?v=1.12.1"></script> <div class="waifu"> <!--<div class="waifu-tips"></div>--> <canvas id="live2d" class="live2d"></canvas> <!--<div class="waifu-tool">--> <!-- <span class="fui-home"></span>--> <!-- <span class="fui-chat"></span>--> <!-- <span class="fui-eye"></span>--> <!-- <span class="fui-user"></span>--> <!-- <span class="fui-photo"></span>--> <!-- <span class="fui-info-circle"></span>--> <!-- <span class="fui-cross"></span>--> <!--</div>--> </div> <script src="assets/waifu-tips.min.js?v=1.4.2"></script> <script src="assets/live2d.min.js?v=1.0.5"></script> <script type="text/javascript"> /* 可直接修改部分参数 */ live2d_settings["modelId"] = 1; // 默认模型 ID live2d_settings["modelTexturesId"] = 87; // 默认材质 ID live2d_settings["modelStorage"] = false; // 不储存模型 ID live2d_settings["canCloseLive2d"] = false; // 隐藏 关闭看板娘 按钮 live2d_settings["canTurnToHomePage"] = false; // 隐藏 返回首页 按钮 live2d_settings["waifuSize"] = "160x160"; // 看板娘大小 live2d_settings["waifuTipsSize"] = "570x150"; // 提示框大小 live2d_settings["waifuFontSize"] = "30px"; // 提示框字体 live2d_settings["waifuToolFont"] = "36px"; // 工具栏字体 live2d_settings["waifuToolLine"] = "50px"; // 工具栏行高 live2d_settings["waifuToolTop"] = "-60px"; // 工具栏顶部边距 live2d_settings["waifuDraggable"] = "unlimited"; // 拖拽样式 live2d_settings["waifuDraggableRevert"] = false; /* 在 initModel 前添加 */ initModel("assets/waifu-tips.json?v=1.4.2") </script> </body> </html>joe主题后台引用示例如何你要在其它地方比如joe主题等使用的话就直接将body的内容放在你主题后台设 - 全局设置 - 自定义中即可 <!-- waifu-tips.js 依赖 JQuery 库 --> <script src="assets/jquery.min.js?v=3.3.1"></script> <!-- 实现拖动效果,需引入 JQuery UI --> <script src="assets/jquery-ui.min.js?v=1.12.1"></script> <div class="waifu"> <!--<div class="waifu-tips"></div>--> <canvas id="live2d" class="live2d"></canvas> <!--<div class="waifu-tool">--> <!-- <span class="fui-home"></span>--> <!-- <span class="fui-chat"></span>--> <!-- <span class="fui-eye"></span>--> <!-- <span class="fui-user"></span>--> <!-- <span class="fui-photo"></span>--> <!-- <span class="fui-info-circle"></span>--> <!-- <span class="fui-cross"></span>--> <!--</div>--> </div> <script src="assets/waifu-tips.min.js?v=1.4.2"></script> <script src="assets/live2d.min.js?v=1.0.5"></script> <script type="text/javascript"> /* 可直接修改部分参数 */ live2d_settings["modelId"] = 1; // 默认模型 ID live2d_settings["modelTexturesId"] = 87; // 默认材质 ID live2d_settings["modelStorage"] = false; // 不储存模型 ID live2d_settings["canCloseLive2d"] = false; // 隐藏 关闭看板娘 按钮 live2d_settings["canTurnToHomePage"] = false; // 隐藏 返回首页 按钮 live2d_settings["waifuSize"] = "160x160"; // 看板娘大小 live2d_settings["waifuTipsSize"] = "570x150"; // 提示框大小 live2d_settings["waifuFontSize"] = "30px"; // 提示框字体 live2d_settings["waifuToolFont"] = "36px"; // 工具栏字体 live2d_settings["waifuToolLine"] = "50px"; // 工具栏行高 live2d_settings["waifuToolTop"] = "-60px"; // 工具栏顶部边距 live2d_settings["waifuDraggable"] = "unlimited"; // 拖拽样式 live2d_settings["waifuDraggableRevert"] = false; /* 在 initModel 前添加 */ initModel("assets/waifu-tips.json?v=1.4.2") </script>
-
-
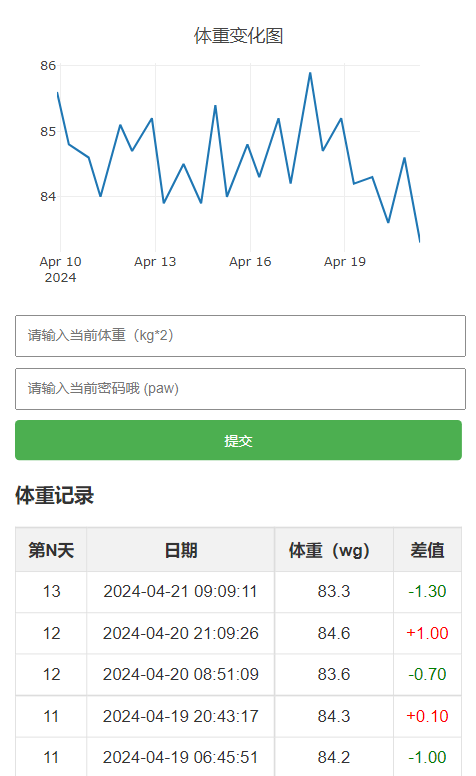
在线网页体重记录表 前言代码在小程序端展示会异常需要的请移步网址 uurr.cn 获取 ::(灯泡)效果简介在本文中,我们将介绍一个简单的体重记录表的网页代码示例。该代码能够实现以下功能:用户可以输入体重数据和密码。输入正确密码后,将数据以时间戳的形式写入到文件中。读取已保存的体重数据,并生成体重变化折线图。显示体重数据的记录表,包括日期、体重和与上次体重的差值。代码功能详解体重数据提交和密码校验代码首先检查用户是否提交了体重数据,并验证密码是否正确。只有密码正确时才允许提交体重数据,否则会提示密码错误。体重数据处理如果存在本地文件 "weights.csv",代码会读取其中的体重数据,并生成折线图。同时,会计算体重数据间的差值,并标注在记录表中,用不同颜色表示增减情况。生成折线图 利用Plotly.js库绘制折线图,展示体重变化趋势。每个数据点上将显示具体的体重数值。记录表展示 在记录表中展示体重数据,包括第N天、日期、体重以及与上一次体重的差值。差值会根据正负情况以不同颜色标识,并保留两位小数。代码 <!DOCTYPE html> <html lang="zh-CN"> <head> <meta charset="UTF-8"> <meta name="viewport" content="width=device-width, initial-scale=1.0"> <title>体重记录表</title> <!-- 引入 Plotly.js 用于绘制折线图 --> <script src="https://www.w3school.com.cn/lib/graphics/plotly.js"></script> <style> body { font-family: Arial, sans-serif; margin: 20px; color: #333; } h2 { color: #333; text-align: center; } form { margin-bottom: 20px; } input[type="text"] { padding: 10px; width: calc(100% - 20px); margin-bottom: 10px; } input[type="submit"] { padding: 10px; background-color: #4CAF50; color: white; border: none; border-radius: 4px; cursor: pointer; width: 100%; } input[type="submit"]:hover { background-color: #45a049; } #chart { margin-bottom: 20px; width: 100%; } @media screen and (max-width: 759px) { /* 在屏幕宽度大于760像素时应用以下样式 */ #chart { height: 260px; } } table { border-collapse: collapse; width: 100%; } th, td { border: 1px solid #ddd; padding: 10px; text-align: center; } th { background-color: #f2f2f2; } </style> </head> <body> <?php // 检查是否有体重数据提交 if ($_SERVER["REQUEST_METHOD"] == "POST" && isset($_POST["weight"])) { $weight = $_POST["weight"]; $paw = $_POST["paw"]; // 检查密码是否正确 if($paw != "gtt") { echo "密码错误,请重新输入。密码是你的名字拼音小写"; exit; // 停止执行后续代码 } // 生成当前时间戳 $timestamp = date("Y-m-d H:i:s"); // 将数据写入本地文件 $file = fopen("weights.csv", "a"); fwrite($file, "$timestamp,$weight\n"); fclose($file); // 提交成功后进行重定向 header('Location: index.php'); } else { // 读取体重数据并生成折线图 // 检查文件是否存在 if (file_exists("weights.csv")) { $weights = []; $timestamps = []; $file = fopen("weights.csv", "r"); while (!feof($file)) { $line = fgets($file); $data = explode(",", $line); if (count($data) == 2) { $timestamps[] = $data[0]; $weights[] = $data[1]; } } fclose($file); // 检查是否有体重数据,如果有则生成折线图的JavaScript代码 if (!empty($weights)) { // 计算日期差 $prev_date = date('Y-m-d', strtotime($timestamps[0])); $start_date = strtotime($prev_date); $table_data = []; for ($i = 0; $i < count($weights); $i++) { $curr_date = date('Y-m-d', strtotime($timestamps[$i])); if ($curr_date != $prev_date) { $date_diff++; $prev_date = $curr_date; } $table_data[] = [ 'day' => $date_diff + 1, // 加1修正为第一天 'date' => $timestamps[$i], 'weight' => $weights[$i] ]; // 判断差值 for ($j = 1; $j < count($table_data); $j++) { $prev_weight = $table_data[$j - 1]['weight']; $curr_weight = $table_data[$j]['weight']; $weight_diff = $curr_weight - $prev_weight; $weight_diff = number_format($weight_diff, 2); // 保留两位小数 $table_data[$j]['weight_diff'] = $weight_diff; // 标记颜色 if ($weight_diff < 0) { $table_data[$j]['color'] = 'green'; } elseif ($weight_diff > 0) { $weight_diff = '+' . $weight_diff; $table_data[$j]['color'] = 'red'; } } } echo '<div id="chart"></div><div id="chart_"></div>'; echo '<script>'; echo 'var trace = {'; echo ' x: [' . implode(',', array_map('json_encode', array_column($table_data, 'date'))) . '],'; echo ' y: [' . implode(',', array_column($table_data, 'weight')) . '],'; echo ' type: "scatter"'; echo '};'; echo 'var layout = {'; echo ' title: "体重变化图",'; echo ' xaxis: {'; echo ' title: ""'; echo ' },'; echo ' yaxis: {'; echo ' title: ""'; echo ' },'; echo ' margin: {'; echo ' l: 40,'; echo ' r: 40,'; echo ' t: 40,'; echo ' b: 40'; echo ' },'; echo ' hovermode: false,'; echo ' modebar: {'; echo ' displayModeBar: false'; echo ' }'; echo '};'; echo 'Plotly.newPlot("chart", [trace], layout, { displayModeBar: false, responsive: true, staticPlot: true, });'; echo '</script>'; echo '</div>'; } } else { echo "暂无体重数据。"; } ?> <form method="post" action="index.php"> <input type="text" autocomplete="off" id="weight" name="weight" placeholder="请输入当前体重(kg*2)" required><br> <input type="text" autocomplete="off" id="paw" name="paw" placeholder="请输入当前密码哦 (paw)" required><br> <input type="submit" value="提交"> </form> <?php // 输出表格 echo '<h3>体重记录</h3>'; echo '<table>'; echo '<tr><th>第N天</th><th>日期</th><th>体重(wg)</th><th>差值</th></tr>'; // 检查 $table_data 是否为空 if (!empty($table_data)) { rsort($table_data); foreach ($table_data as $data) { $weight_diff = isset($data['weight_diff']) ? $data['weight_diff'] : ''; $color = isset($data['color']) ? $data['color'] : ''; if ($weight_diff == "") { $weight_diff = '0.00' ; } elseif ($weight_diff < 0) { } elseif ($weight_diff > 0) { $weight_diff = '+' . $weight_diff; } // 根据颜色设置样式 $style = ''; if ($color) { $style = 'style="color: ' . $color . ';"'; } echo '<tr><td>' . $data['day'] . '</td><td>' . $data['date'] . '</td><td>' . $data['weight'] . '</td><td ' . $style . '>' . $weight_diff . '</td></tr>'; } } else { echo '<tr><td colspan="4">暂无体重数据。</td></tr>'; } echo '</table>'; } // 在顶部显示数值 function addAnnotations($data) { $annotations = []; for ($i = 0; $i < count($data['x']); $i++) { $annotation = array( 'x' => $data['x'][$i], 'y' => $data['y'][$i], 'text' => number_format($data['y'][$i], 2), // 显示数值,保留两位小数 'xref' => 'x', 'yref' => 'y', 'showarrow' => true, 'arrowhead' => 0, 'ax' => 0, 'ay' => -30 ); $annotations[] = $annotation; } return $annotations; } ?> </body> </html>